Print Photo Style Video Editing: Friends, welcome to all of you on this blog of ours and in today’s article, another new trending lyrics status is going to edit the video. Well, friends, you all know that we keep coming to this blog of ours from time to time with editing articles, so if you like to do video editing, then follow this blog of ours and share it with your friends.
Friends, in today’s article Print Photo Style Video Editing, we are going to teach you to edit a new kind of video. If you want, you can also edit this video like a birthday video. In it, you just have to add the video of the happy birthday lyrics video and if you do not want to edit the birthday video and just want to edit the lyrics video, then you have to use what I have given the lyrics video of the song.
Print Photo Style Video Editing
So before editing the video, here we take information about which applications and what materials you will need. First of all, let me tell you that I have given a link to all the materials that you will need to edit this video, so you can use it from there.
So as I told you above, you will get the material needed for this video at the end of this article. Now let’s talk about the application required for this video, so to edit this video, first of all, you have to edit the photo. For that, you will need the Pixallab application. So if you don’t have a Pixallab application then you can easily install it from the Play Store. At the same time, to edit the video, you will need the KineMaster application, which will be easily found on the Play Store.
So if you do not have any of these two applications, then first of all install them from the Play Store, then follow all the steps that I have mentioned below.
Print Photo Style Video Editing: Materials and applications required to edit videos.
- Pixallab Application
- Kinemaster Application
- Photo Print Frame
- Particle Video
- Lyrics Or Birthday Text Video
Print Photo Style Video Editing: Step By Step:
Steps 1
First of all, you have to open the Pixellab application. After opening the application, you have to add any one photo by clicking on the top which gets a low view of the plus, for which you are making videos with it.
Now after adding the photo, you have to remove the background of that photo, then to remove, you have to click on the top of the photo, then go to the option of editing and there you will get to see the option of eraser, go to it. From here you have to remove the background of the photo.
Steps 2
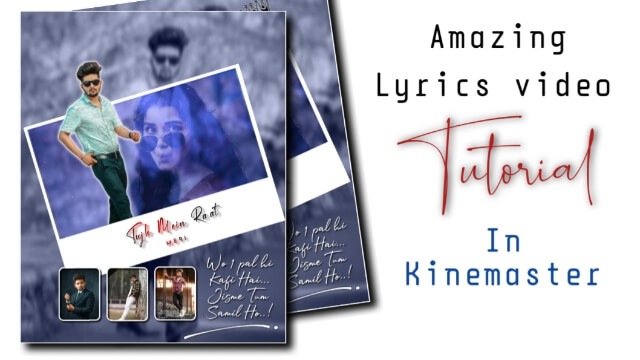
After removing the photo’s background, you now have to add the print photo frame to the Pixallab application, which I have given you with the material. After adding it, you have to crop the background of the photo that you removed from the bottom and set the photo as it appears in the Print Photo Style Video Article’s thumbnail.
Steps 3
Now you have to click on the top of the photo and go to the option of editing again, there you will get to see the option of a shadow, go to it and enable the shadow.
After that, you have to go to the color of the lions and select the white color there. With this, if your photo editing has been done, then you have to go to the background option and select the transparent in the background.
Steps 4
Now you have to save this photo in your gallery, so to save, you will see the save button on the top side, click on it, select the quality of the photo where you have to keep it high quality, and then save the image.
Steps 5
Now you have to exit Pixallab and then open the Cine Master application to edit the video.
Steps 6
After opening the Key Master, you have to open a new project with a 4:5 ratio and add the background image of every photo you removed the background to it, and make the image of the video as much as the second you want to edit the image.
Steps 7
Now you have to import the image that you created from Pixellub in this project. After importing it, set it the way it is shown in the Print Photo Style Video Article’s thumbnail.
Steps 8
After that, you have to add three different photos on the bottom as shown in the Print Photo Style Video Article’s thumbnail.
Steps 9
Now you have to add the video from the particle to this project, then click on the particles video layer and keep it on the right side and you will get to see a blending option on the right side, go to it and select the screen effect.
You have to set the video from these particles to the image that you have added with the Print Frame.
Steps 10
Now you have to export the video, your video is ready.
So hopefully you all will have liked today’s article print photo style video if you have any questions related to this article of print photo style video, then you must tell us by commenting.
All Materials.
Download NowSubscribe To Us On YouTube.
Comments
Post a Comment